Maemo for mobile developers
Using Eclipse with ESbox
Table of contents
- Introduction: Eclipse and ESbox
- Requirements
- Installing Eclipse and ESbox
- Creating a new C/C++ maemo project
- Running maemo environment inside Eclipse
- Compiling and running a project inside Eclipse
- Testing Application inside the device through Eclipse
- Creating a debian package of application through Eclipse
Introduction: Eclipse and ESbox
Eclipse is an IDE for developing C/C++/Java applications. It provides tools for debugging and building applications, among various other utilities. ESbox is an Eclipse plug-in designed to provide maemo facilites that make project development easier.
Requirements
ESbox runs inside Eclipse with CDT (C/C++ Development Tools) installed. Eclipse needs a Java Virtual Machine to run properly (Sun's Java 6 or above is recommended). ESbox also needs Scratchbox targets to build and run maemo projects. To run ESbox on your machine, you need:
- Scratchbox Apophis
- Java(TM) SE Runtime Environment
- Eclipse Project (Latest Release)
- Eclipse CDT (Latest CDT Europa Release)
Installing Eclipse and ESbox
Follow these instructions to install Eclipse and the plug-ins needed to run ESbox:
Install Eclipse by unpacking the Eclipse tarball-gzipped package:
$ tar xzf eclipse-SDK-3.3.x-linux-gtk.tar.gzWhere x is the latest version number of the package.
Create a temporary directory for Eclipse CDT and unzip it there:
 $ mkdir eclipse-cdt-4.0.x
 $ unzip cdt-master-4.0.x.zip -d eclipse-cdt-4.0.x
Where x is the latest version number of the package.
-
If if proxy configuration is necessary:
$ export http_proxy=proxy ip adress:port Execute Eclipse:
$ eclipse/eclipse
In Eclipse, go to Help > Software Updates > Find and install...

Next, select Search for new features to install and click Next.

A new window showing the update sites to visit opens. Add both Eclipse CDT and ESbox sites' support. For Eclipse CDT, click New Local Site....

Select the directory where you unzipped Eclipse CDT and click OK. Next, fill in the site name and click OK.
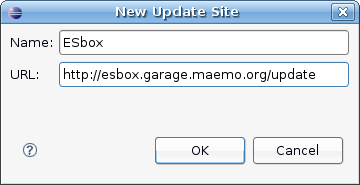
For ESbox, click on New Remote Site.... Fill in the site name, and insert http://esbox.garage.maemo.org/update in the URL field:
Click OK and Finish.
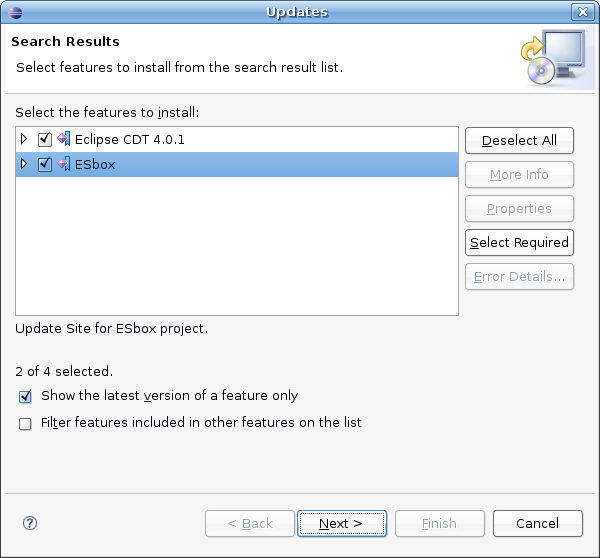
Search Results window opens. Select both sites and click Next.
The Feature License window opens. Select I accept the terms in the license agreements and click Next.

The Installation window opens. Click Finish.

After downloading ESbox, a Feature Verification window opens. This is shown because ESbox feature is not digitally signed. Click Install All.

After installing, a window asking for permission to restart Eclipse for the changes to take effect appears. Click Yes.

That's it! After Eclipse restart, there are two new icons on the Eclipse menu bar:
The first icon manages maemo environment (start/stop/restart). The second icon manages the maemo's emulated X window execution (start/stop).
Creating a new C/C++ maemo project
You can create a new project by going to File > New > C/C++ Maemo Project.

Select the type of project, the platform it will run and the maemo SDK to be used. Also give the project a name. Click Next to continue.

Now you can enter the project author, the copyright notice, and also modify the "Hello World" string of the application. Click Next to continue.

Select the Scratchbox target you want to associate with your maemo project. Click Finish to end project creation.

After the process creation, the project and its files will appear on Project Explorer (left of the window). In the middle you can see the source code of a file from that project and on the right the objects from that source code.

Running Maemo environment inside Eclipse
Now, you can make use of the ESBox plug-ins to launch the maemo environment:
Click the Xephyr "X" button on the toolbar to start the Xephyr X Window System:

Click the maemo "m" button on the toolbar to launch the Maemo Application Framework:

Compiling and running a project inside Eclipse
After creating a project, it will automatically configure it. Under the hood, it generates the configure script and runs it, generating another file called Makefile, that is used for building the project. This step is necessary if you plan to build the project inside Eclipse. Once compiled, it can be run inside Maemo. If you want to manually generate another configure file, right-click on your project directory and select Build Application:

There you will find three options: Build All, Configure, and Generate Configure. The last option generates the configure file, the middle option runs it, and the first builds the project according to the Makefile file (created after configure execution). Every option generates an output at the Console window. From there you can see if the execution of your selected option was done correctly (or not). Notice that you need to select Build All if you wish to build your project.
After building your project, you need to create a new run configuration. Select Run > Open Run Dialog...

The Run window opens. Select Maemo Local Application and click the New icon:

Fill in the configuration name, project, C/C++ Application (full path), and click Apply and Run to finish:

Your application is now running in maemo. If you want to run it again, select the green arrow icon (next to the bug icon) and click Hello World:
